
This checklist is designed to help streamline the foreign yacht clearance process in New Zealand, based on our firsthand experience in September 2025.
BEFORE YOU DEPART:
1. Evaluate food stores
New Zealand has a comprehensive list of items that are prohibited or restricted upon entry. Review the full list here, and plan to use or dispose of any restricted items before your arrival. Here are a few clarifications to help dispel some common misconceptions:
- Fresh produce: Fresh produce is not permitted. Upon arrival, any fresh produce you have should be sealed in a ziplock bag to prevent the spread of fruit flies, so officials can properly dispose of it.
- Dried spices: Officers are generally not concerned with most dried spices. They specifically asked us about bay leaves and fresh herbs, and our chia and sesame seeds were allowed.
- Legumes and beans: Canned beans and legumes are permitted. However, dried or uncooked varieties may be confiscated.
- Pork products: No pork products are allowed, even if canned. This includes baked beans containing pork, canned pork sausages, or pâté/duck preserved in pork fat.
- Dairy products: Canned and fresh butter, powdered milk, and shelf-stable milk were all permitted during our inspection.
As always, declare all food items honestly. Officers will inspect anything that raises questions, but as long as you’re transparent, the process is usually straightforward. If you have prohibited items, they’ll provide a large garbage bag and safely dispose of them for you. Officers have regulations regarding the weight and contents of the disposal bags, and they may not confiscate as much as you expect. It’s best to leave all food items stored normally until they board your vessel and let them do their jobs—they’re efficient and experienced in handling these situations.
2. Evaluate other banned items here.
Plants, seashells, specialty soaps containing honey or tallow, and wooden souvenirs collected during your travels may be subject to inspection or confiscation. Check the official list (linked above) and prepare these items for presentation at check-in. In our case, we brought a jar of shells and souvenirs, which were examined by the officer and ultimately cleared for us to keep.
3. Apply for your NZeTA (if applicable).
Some travelers can enter New Zealand without applying for a visa in advance by using an NZeTA (New Zealand Electronic Travel Authority). Eligibility depends on your passport, mode of travel, and whether you’re visiting or just transiting. An NZeTA is valid for two years and allows for a stay of up to 90 days per visit. It only becomes active upon arrival, so you can apply well in advance and check it off your to-do list. In our case, we entered New Zealand on an NZeTA, then applied for a Visitor Visa before the 90-day period ended to extend our stay.
5. Clean your hull!
New Zealand has the strictest biosafety regulations we have encountered. Your hull needs to be meticulously maintained. Be sure to thoroughly clean all niche areas (thru hulls, props, etc.) within 30 days of arrival. Here are the official guidelines, explanations, and an FAQ brochure.
6. Document the state of your hull.
Grab your dive light and record a continuous video that clearly shows your boat name, then pans slowly over the entire hull below the waterline, including all niche areas like thru-hulls, propellers, and rudders, illuminating as necessary. Take your time and ensure clear visibility; the footage must be bright and detailed enough for officials to assess your hull’s condition. Do not cut or stitch clips together; they want a single, unedited raw video file. Although we were allowed to submit photos instead of a video, we found this impractical. Our photos were rejected for being too dark, not high enough quality, and missing some parts of the hull. Capturing every area of the hull with acceptable clarity would have required 30+ high-quality photos. The biosafety officer we spoke with also emphasized the importance of having the boat name visible in the cleaning evidence—something that’s difficult to achieve with still images. If you submit photos, be ready to provide the original, unedited image files (not a PDF). Do not overlay the date on the image. The metadata (including the date and time) should be intact in the image file properties.
7. Gather supplemental proof of hull maintenance.
For example, receipts from previous haul outs when antifoul was applied, the type of antifoul you have, the manufacturer’s suggested lifespan, any personal logs you may keep of previous hull cleanings, etc.
8. Fill out and submit the Advance Notice of Arrival form (available to download at the bottom of this post).
Craft an email that includes the completed Advanced Notice of Arrival (ANOA) form, a copy of your certificate of vessel registration, a scanned copy or photograph of the bio-page of passport for all passengers and crew on board, a full photograph of your vessel, and evidence of vessel value (bill of sale or insurance documentation that lists the value) and send it to yachts@customs.govt.nz. You must submit this information no less than 48 hours before arriving in New Zealand, but it is recommended you submit this prior to your departure from an overseas port, because it will trigger the email from NZ MPI (biosecurity). This gives you the opportunity to gain biosecurity pre-clearance before you’re underway, when it might be difficult to get in the water to gather more evidence of the condition of your hull if necessary. If you know you will be stopping over at Minerva Reef, you can complete this step there.
9. Submit Biosecurity Pre-Clearance information by responding to the email you’ll receive from NZ MPI after submitting your Advanced Notice of Arrival.
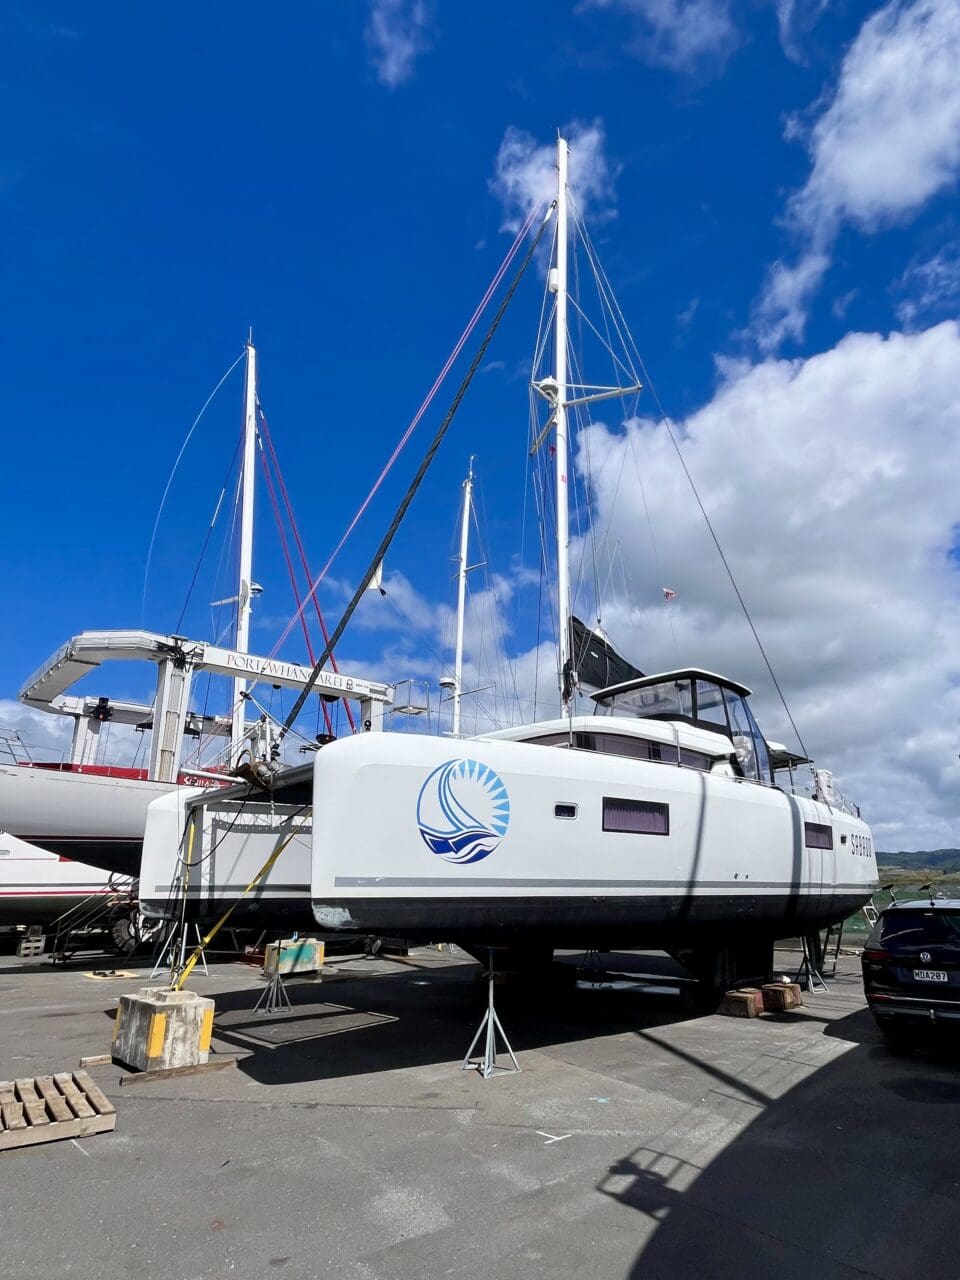
For context, see the bottom of this post for the exact wording of the email we received. Keep in mind that this is a new system, and the wording may change over time. Simply copy and paste the questions they ask you into an email reply, answer them, and upload the video of your hull through the file share link they provide. If your submission is denied, you have two options: collect more suitable evidence (which may include re-cleaning and re-filming your hull), and resubmit. Or, wait for the on-arrival assessment. Just be aware: vessels with pre-clearance are prioritized during check-in. If the Q Dock is busy when you arrive and you don’t have pre-clearance, you may be delayed. In that case, biosecurity officers will board your vessel with their own underwater camera and light, and thoroughly review all of your supplemental documentation and footage in person. If your hull is not up to their standards, you may be required to haul out within 24 hours at an MPI-approved facility (at your expense). Our Pre- Clearance photos were denied, and we failed the on arrival assessment. I’ve included the photos we submitted and some photos of the hull after our mandatory haul out (before hull cleaning began) at the bottom of this post.
10. Print and fill out a Small Craft Inward Report (available to download at the bottom of this post).
You can leave your arrival details blank until you are underway, but the Customs & Immigration officials boarded our boat shortly after our arrival, so it was nice to have the bulk of this form filled out and ready.
11. Submit your Travelers Declaration
When traveling by sea, the earliest you can submit your declaration is 24 hours before departing the vessel’s last foreign port prior to arriving in New Zealand. At the latest, it needs to be submitted by the time the vessel has berthed at its first port in New Zealand.
WHILE UNDERWAY:
1. Update Advance Notice of Arrival form (if necessary).
Resubmit an updated ANOA with amended arrival date and time if needed. This is especially important if you will be arriving before your original ETA.
2. Submit Travelers Declaration if you didn’t do it before departure.
3. Re-evaluate food stores
Prioritize consuming fresh produce and other banned items during your passage. Seal all fresh produce before arriving in New Zealand waters.
UPON ARRIVAL:
1. Radio ahead
When nearing New Zealand waters (12 nautical miles offshore), contact Maritime Radio on 4125 kHz, 6215 kHz, or VHF Ch 16 to inform them of your ETA.
2. Display the Q-Flag
Once you enter New Zealand’s territorial waters, clearly display the international Q-flag.
3. Proceed to a PoFA
You must arrive at a designated Place of First Arrival (PoFA). Several marinas have this capability; you can find the full list of approved entry points here. We cleared in at Opua, Bay of Islands Marina, several hours before sunrise. Be aware: there are no lights on the Q Dock.
4. Clear Customs and Immigration
Stay on board your vessel until the local officials meet you for inspection. For us, 2 Customs and Immigration officials arrived on a dinghy around 8am. We welcomed them aboard; one sat with us at the saloon table to begin reviewing our paperwork. The other started their inspection: opening all cabinets, drawers, and compartments, but not rummaging through the contents too much. It was thorough, but very respectful. At this stage, they are looking for prohibited goods like drugs, firearms, etc., duty and tax declarations like alcohol and tobacco, and commercial goods (anything that looks like it might be intended to sell). The other officer took our Inward Report, checked our passports and boat documentation, and assisted us with obtaining a Temporary Import Entry (TIE). This customs process allows visiting yachts to stay in New Zealand for up to 24 months without paying import duty or GST on the vessel. Note: To obtain a TIE, you must complete a carbonless paper version of the C4G form. The officer will provide this; you do NOT need to print and fill one out in advance. Before they left, they gave us a carbonless paper version of the Master’s Declaration form to fill out while we waited for the biosecurity officer to arrive. I’ve linked it for you here so you know what to expect, but you do NOT need to print and fill this out in advance, because they require it to be completed on the carbonless paper. Tip: Just because you are asked to declare an item on the form does not mean they will inspect or confiscate it! Leave all food items where you usually store them. The officer will ask you to show them specific items they may be concerned about.
5. Clear Biosecurity
The biosecurity officer will inspect your vessel for pests and any prohibited biological items, including food, plant/animal products, or souvenirs. If necessary, they will also assess your hull condition and any supporting biofouling documentation. At the end of the inspection, the officer will either grant clearance or require your vessel to be hauled out at an approved facility. If a haul-out is necessary, the facility will carry out the cleaning and provide the documentation. Once the process is complete, clearance will be issued to you by email.
6. Pay Border Clearance Levy
Several days later, we received an email invoice for $68.91 NZD, payable online by credit card.
Safe travels, folks! We hope this free guide helps streamline your check in experience. If you found this helpful, don’t forget to subscribe and share. 🙂
4 Responses
This is great, thank you!
See you soon!
Great information! Thank you for taking the time to write this all down. So useful to get recent experience as things do change.
My pleasure! Glad you found it helpful. 🙂